
User manual
From a tour of the screen to operators, patch-based routing, filters, modulation and effects, with screenshots of the real interface.
Guide to the screen
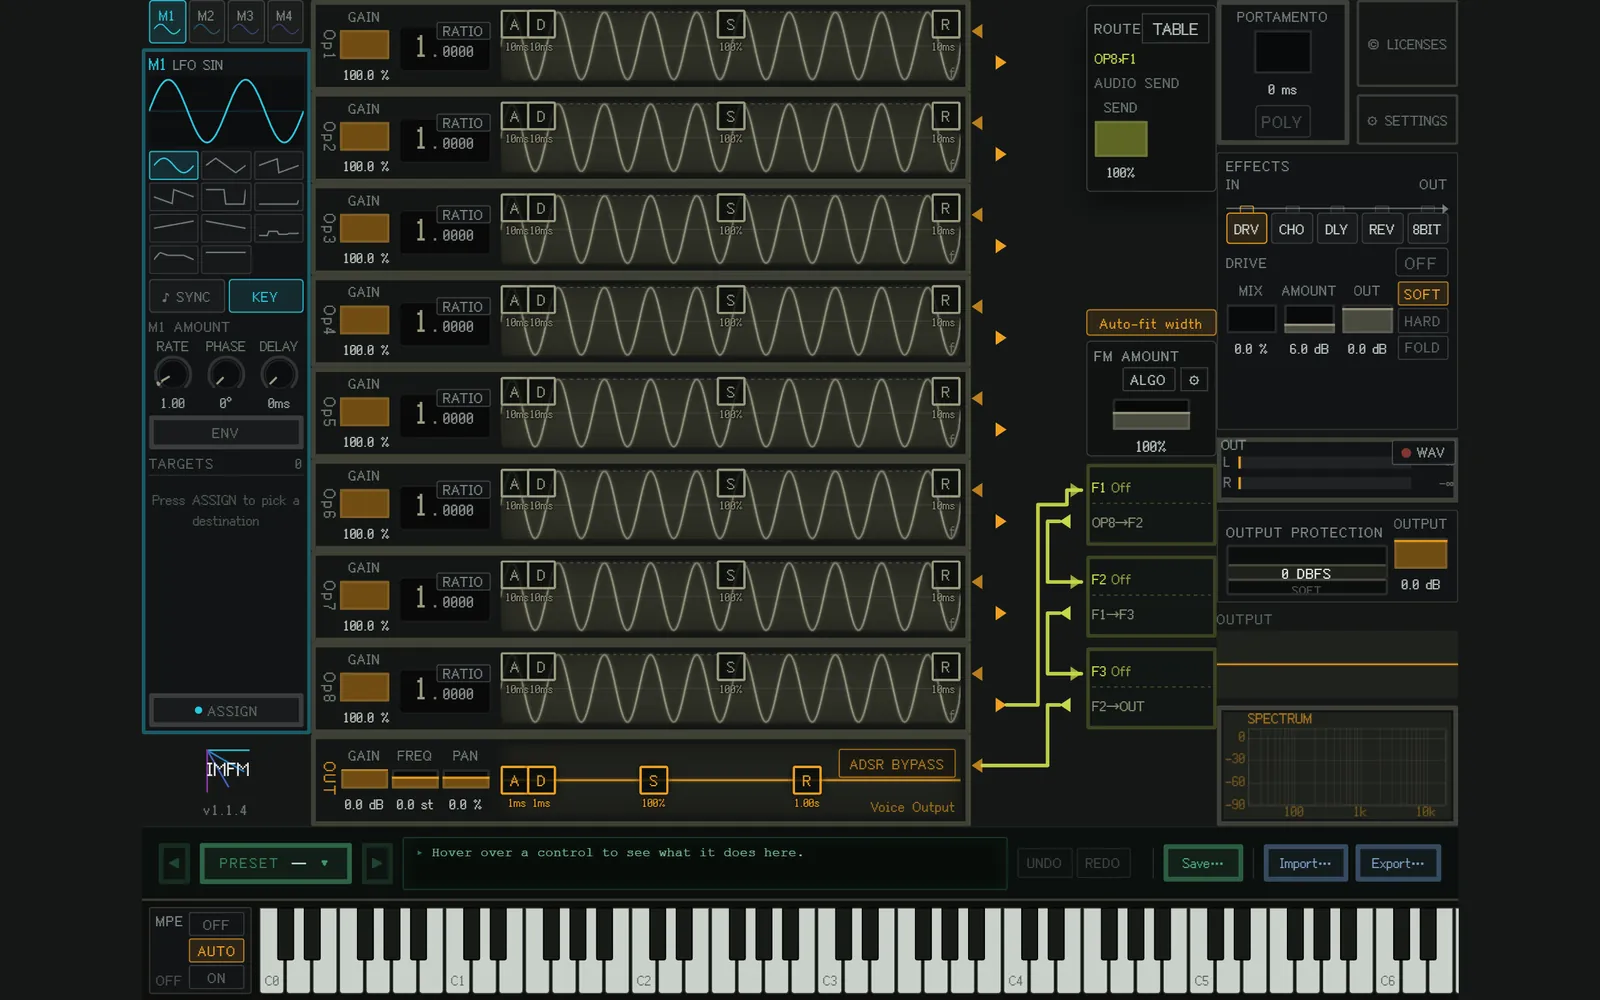
The upper part of the screen is divided into these blocks, from left to right.
- Modulation (M1–M4)
- Eight operators and the output (OUT)
- Patch-based routing: the wiring between operators and filters. The ROUTE panel at its top right sets the amount and more for each wire (TABLE opens two tables, FM / PHASE and AUDIO / FILTER, for editing; ← OPERATORS goes back).
- Filters (F1–F3)
- The block on the right: portamento, the license and settings buttons, effects, the output meter, OUTPUT PROTECTION and OUTPUT, and the spectrum. FM AMOUNT and ALGO are around here too.
The row just above the MIDI keyboard holds, from left to right:
- Preset selector (PRESET): click it to open the list. ◀ ▶ step through the presets.
- Help line: describes the control the mouse is over. When in doubt, look here first.
- UNDO / REDO: Ctrl+Z undoes; Ctrl+Shift+Z or Ctrl+Y redoes (Cmd on a Mac).
- Save…: saves the current sound as a user preset.
- Import…: reads IMFMSynth presets (.json) and DX7 banks (.syx).
- Export…: writes the sound out as an IMFMSynth preset.
To the left of the keyboard is the MPE switch. AUTO follows the host's MPE configuration, ON always treats the input as MPE, and OFF turns it off. With ON, the ordinary pitch wheel stops working.
The following sections explain each main feature and how to use it.
Operators
An operator is an FM sound source. There are eight; click one to open its detailed editor (WAVE EDIT).
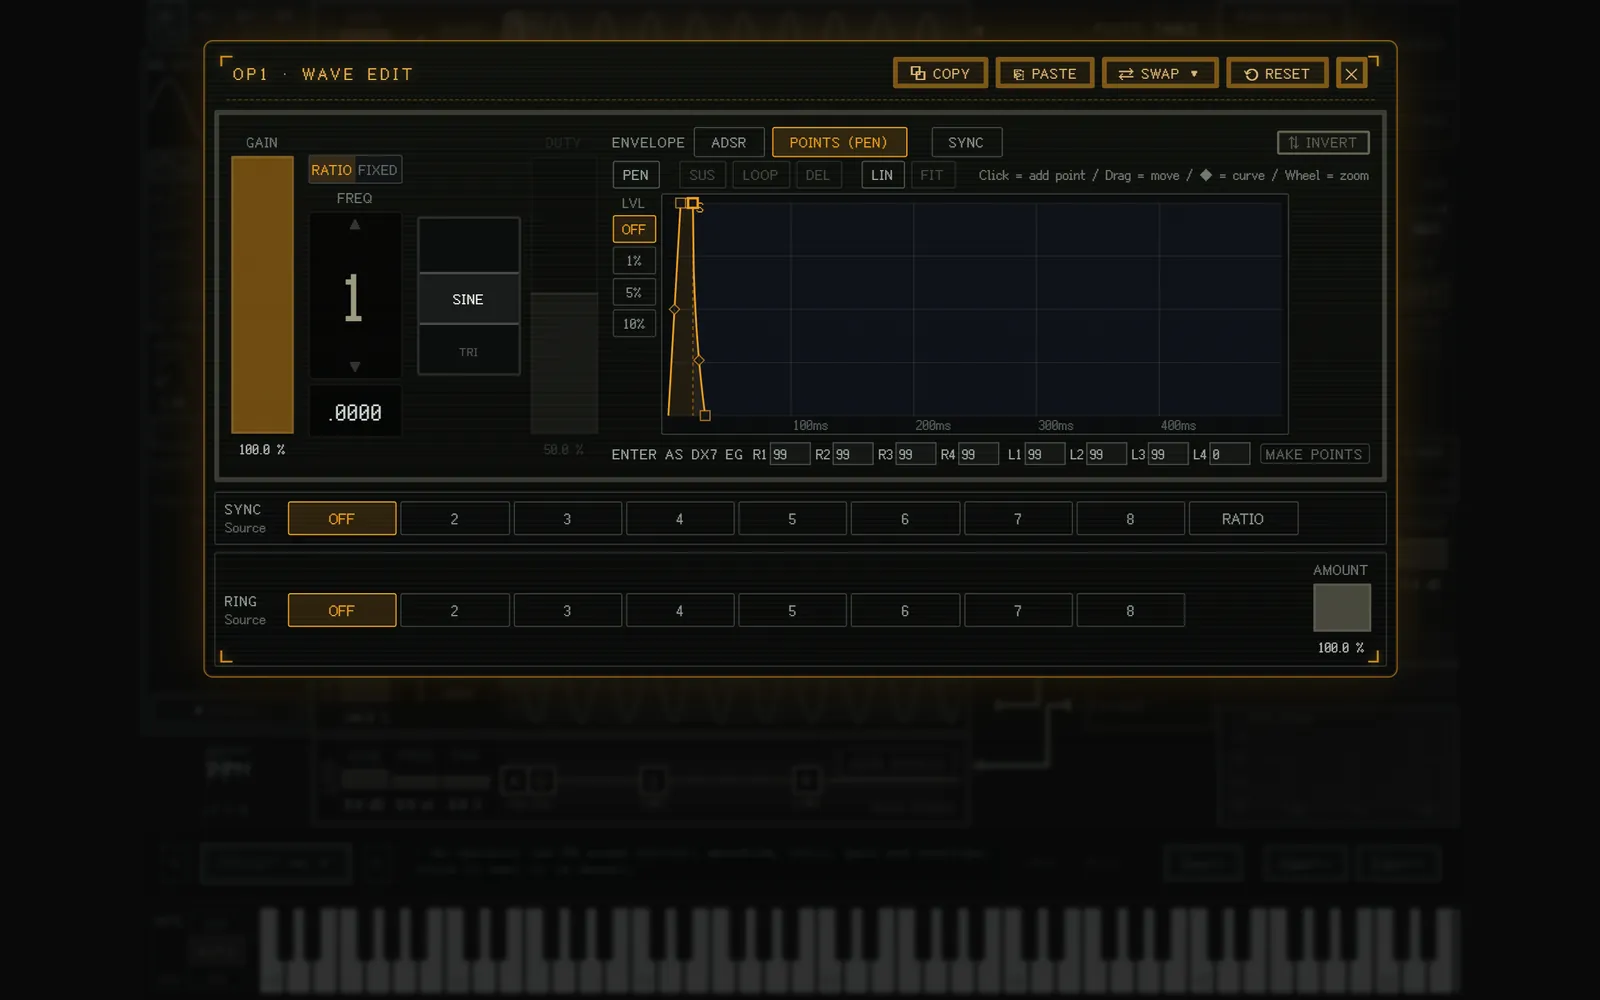
Basic settings
You set GAIN, frequency, waveform and envelope. Frequency is switched with a button between RATIO (a multiple of the key) and FIXED (a set Hz whatever key you press). On a FIXED operator, pitch bend, the Master Freq transposition and portamento have no effect. The pitch EG and modulation of Master Freq or of each operator's frequency do.
The editor has COPY / PASTE / SWAP / RESET at the top. While the editor is open (or for the operator the mouse is over), Ctrl+C / Ctrl+V also copy and paste.
There are also these settings:
- INVERT: flips the sign of the output.
- SYNC: hard sync. The operator restarts from the beginning each time the source operator you pick starts a cycle.
- RING: ring modulation. It multiplies by another operator's output. AMOUNT 0% leaves the sound as it is; 100% is full ring modulation.
Waveforms
You can choose from these waveforms.
- Sine
- Triangle
- Saw
- Square (the duty cycle is adjustable)
- Noise (with an adjustable seed: RND gives new noise every time, 1–9999 gives the same noise every time)
- White
- Pink
- Brown
- Gray
- Wavetable
Wavetables are involved, so they get their own section.
Wavetable waveforms
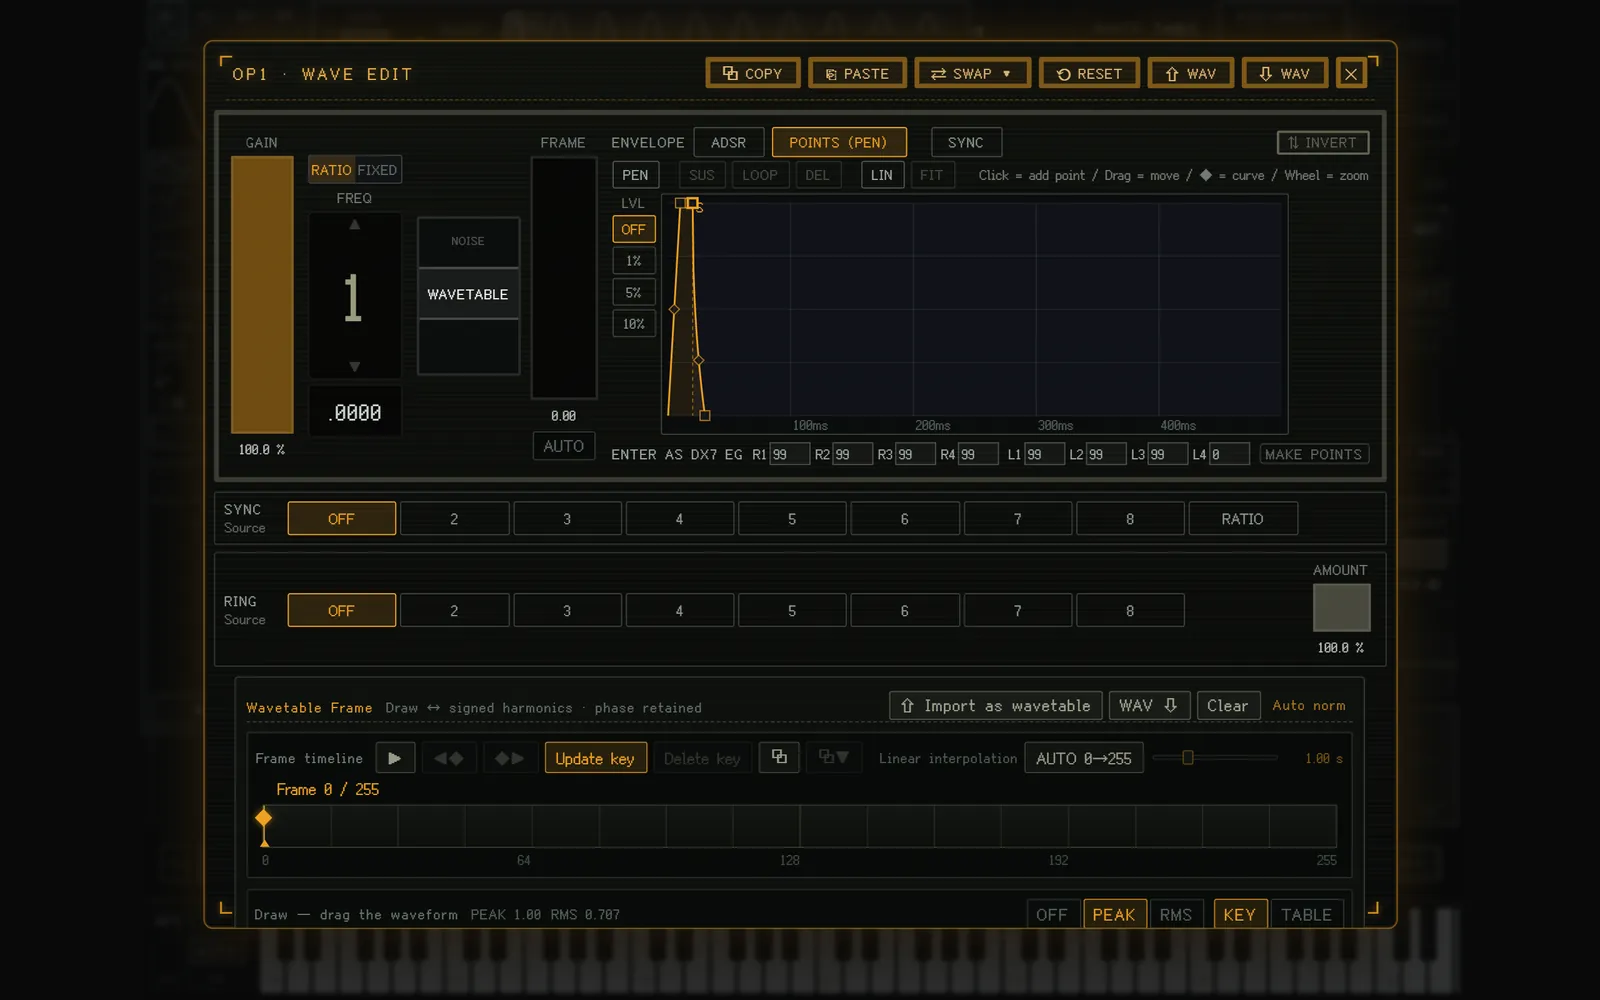
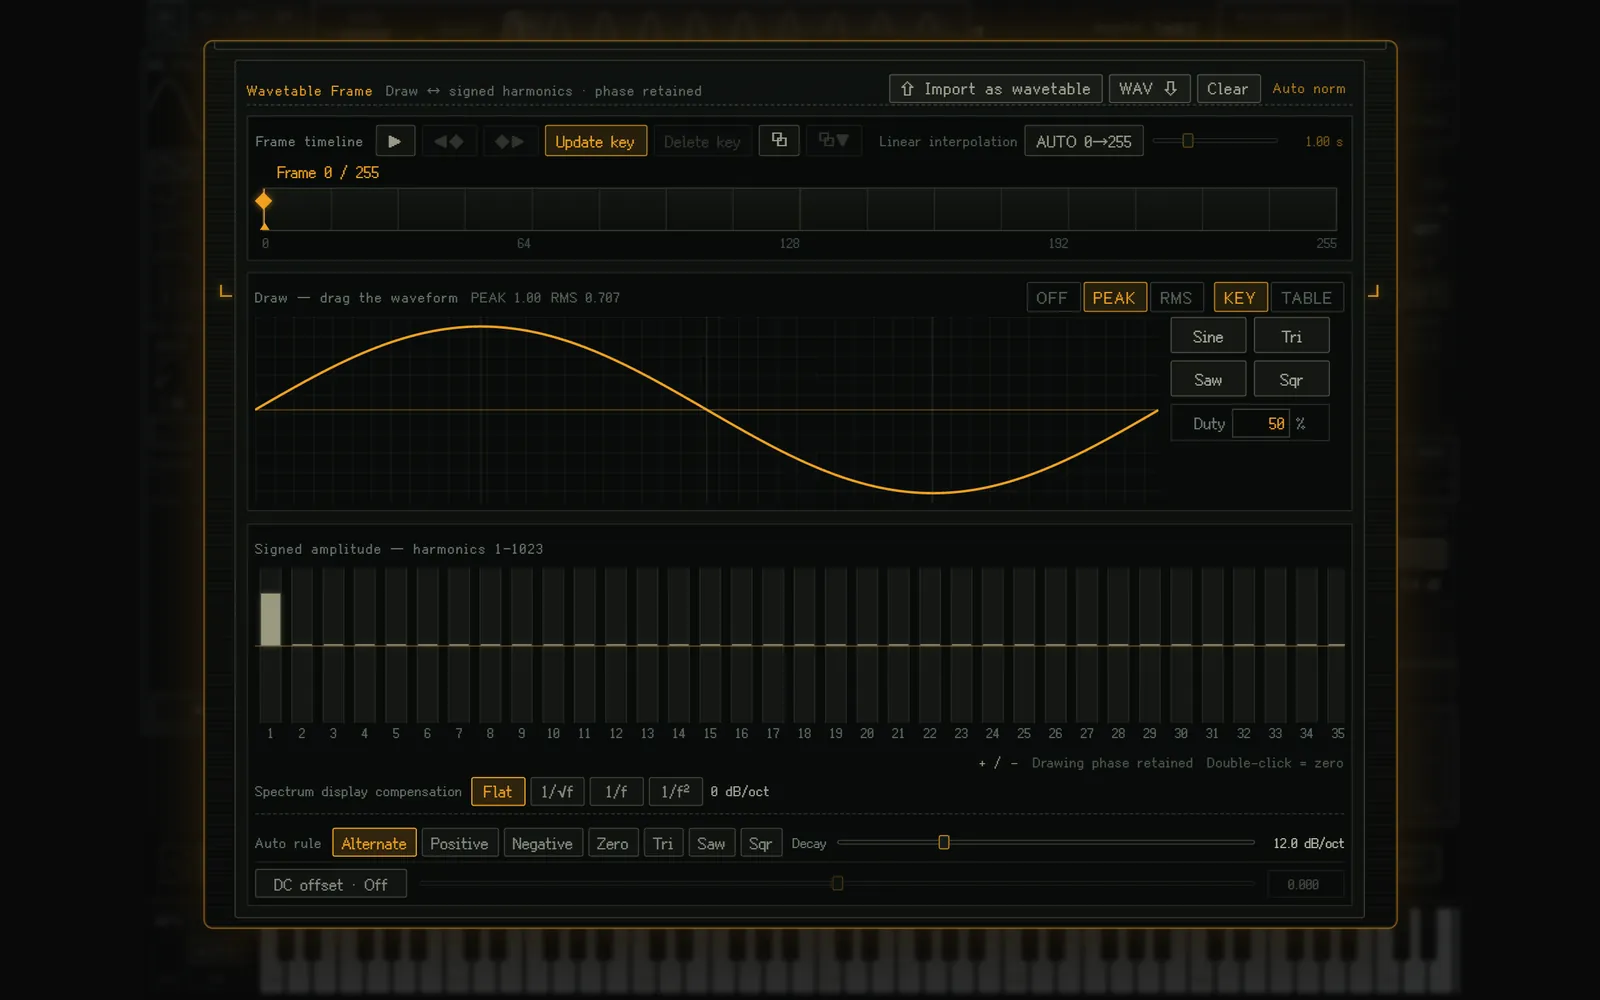
Move to any position on the frame bar and you can draw that keyframe's waveform by hand. Use "Update key" to update a key and "Delete key" to remove one. The frames between keys are interpolated.
The bar graph below is the harmonic graph for the waveform. In other words, you can do additive synthesis. Change one and the other follows automatically. Use whichever way of editing you like.
The FRAME position can be moved by modulation or by connections between operators. With AUTO on FRAME, the frames can also be scanned automatically.
Normalization is done by the plugin outside of editing, so the level never changes while you edit. OFF keeps the samples as they are; PEAK scales the loudest sample to 1; RMS matches a full-scale sine (the peak may go past 1, and for a modulator the peak is the FM depth). KEY levels each keyframe before interpolating (lifting by at most +12 dB); TABLE applies one gain to the whole table.
The buttons let you both export a wavetable as a WAV and import one. There are several ways to import:
- Detect pitch automatically: for ordinary WAV files.
- Set fundamental manually: when you know the fundamental frequency.
- Read as is (2048-sample frames): choose this for WAV files exported from IMFMSynth.
Envelopes
An envelope is set either as an ADSR or as a hand-drawn PEN-mode envelope.
An ADSR is set by dragging or typing values.
In PEN mode (POINTS), click the graph to add points and drag to move them. Drag a ◆ to change the curve between points.
- Press the PEN button to draw freehand. When you let go, the line is simplified to 32 points or fewer.
- LIN: switches the time axis between linear and logarithmic. Linear makes equal note values equally wide, so rhythms are easy to read; logarithmic suits drawing short attacks.
- The vertical axis can snap to an OFF / 1% / 5% / 10% grid. The horizontal axis snaps to a grid that depends on SYNC (tempo sync) and its settings.
- SUS makes the selected point the sustain point. LOOP loops from the selected point to the sustain point (press again to clear). DEL deletes the selected point (double-clicking also deletes).
- FIT shows the whole envelope again. The mouse wheel zooms the time axis around the pointer, and Shift+wheel moves it left and right. Use this for fine work.
- To use a DX7 EG, enter R1–R4 and L1–L4 and press MAKE POINTS to convert it into a POINTS envelope.
Patch-based routing
This is routing that treats operators and filters together.
The things you wire are operators and filters, and each has an input arrow (◀) and an output arrow (▶). The basic way to make a connection is to drag and drop from an output arrow to an input arrow. That makes a patch.
The color of a wire means something: orange is FM (phase modulation), yellow is audio.
Important: no sound is heard unless the wiring reaches the input of the final output (OUT). Initially the sound flows operator 8 → F1 → F2 → F3 → OUT (all the filters are Off). If you cut this wiring the sound disappears, so check here if you get lost.
The amount of a connection is set in the ROUTE panel at the top right. Click the connection you want to set to select it, and you can set its input amount and (when the output is an operator) its phase. The mouse wheel over a wire also changes its amount.
To delete a connection, right-click the wire.
When connections get crowded, "Auto-fit width" widens the graph automatically.
Press "ALGO" to choose from 32 algorithms (six-operator connection diagrams) with the same numbers as the DX7. Choosing one replaces the connections of operators 1–6 and disconnects 7 and 8. Ratios, levels, envelopes and the feedback amount stay as they are, and one choice is one undo. FM AMOUNT scales phase modulation together from 0–200% (100% is the patch as saved). Initially it applies only to the connections between operators; with ⚙ you can add self-feedback and more.
Filters
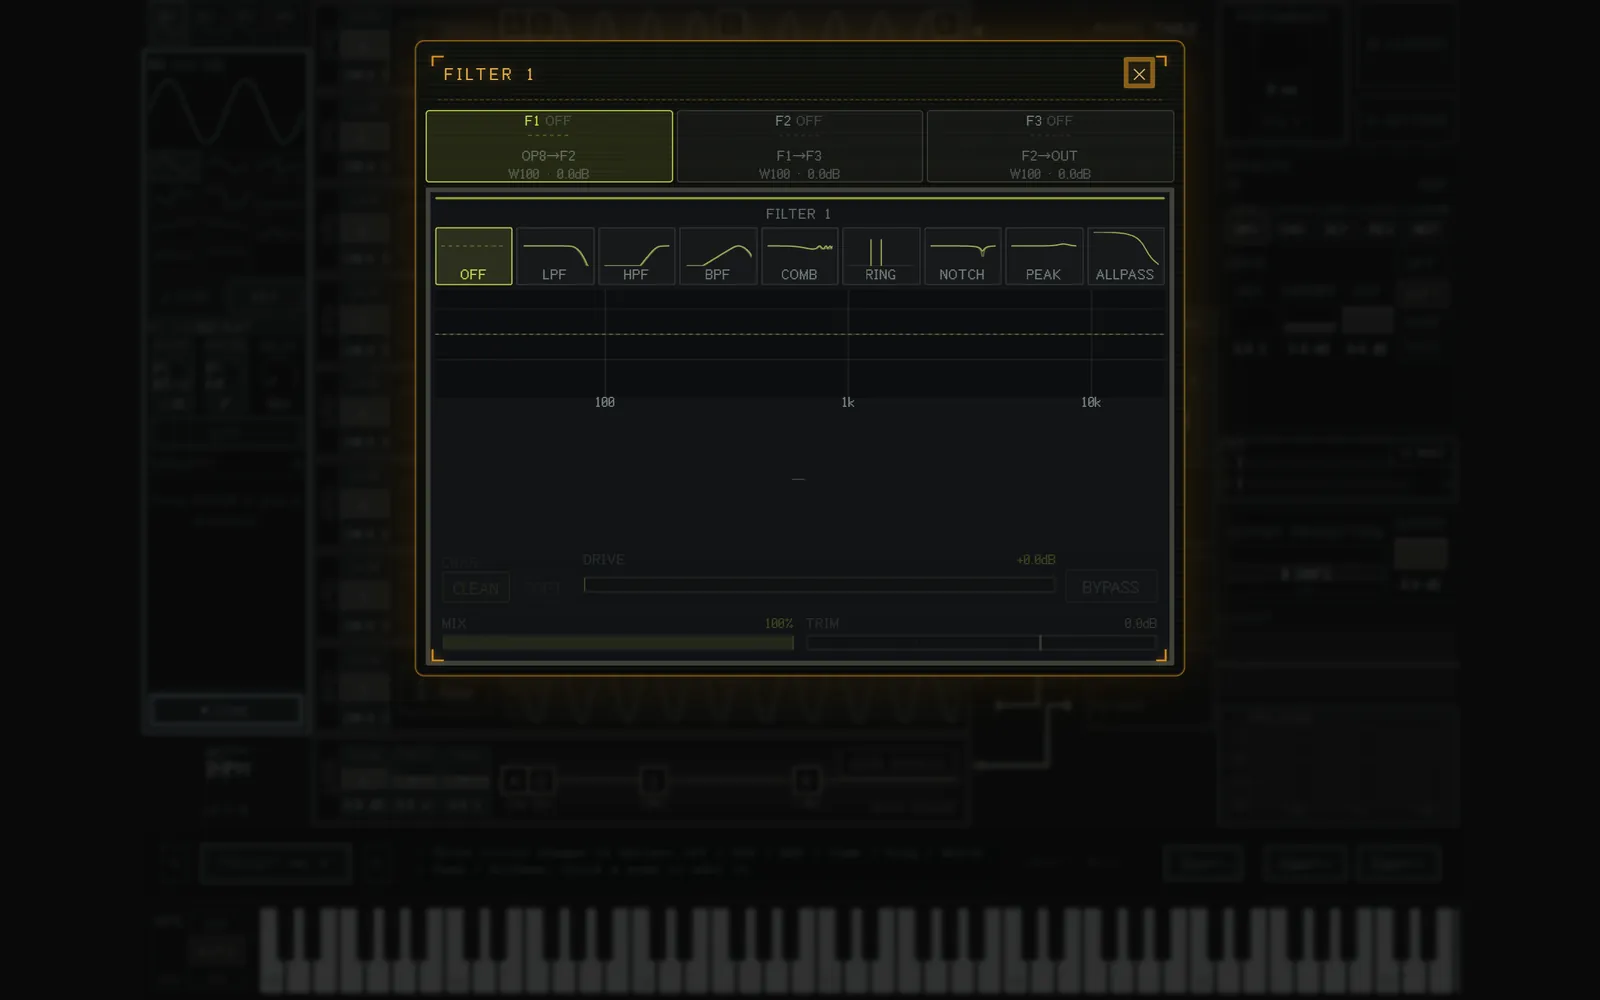
There are three filter stages in series (F1–F3); click a node to open its editor. You can choose from these eight types.
- LPF low-pass filter
- HPF high-pass filter
- BPF band-pass filter
- COMB comb filter
- RING ring modulator
- NOTCH notch filter
- PEAK peak filter (EQ)
- ALLPASS all-pass filter
Basically every filter has two settings, cutoff frequency and resonance (the items vary by type: PEAK has Gain, RING has a frequency, and so on). You can set them by dragging in the two-dimensional UI or with each slider.
They are all fairly self-explanatory, but few synths have key tracking, so here is an explanation. Key tracking moves the chosen frequency along with the pitch of the MIDI note. For example, if you play a high note such as C7 on a bass sound with an ordinary LPF, the sound can fall apart. With key tracking at 100%, the filter treats a note of any pitch with the same character.
It is easy to forget to set MIX to a suitable amount, so take care.
Modulation
There are four modulators, switched with the tabs at the top left (M1–M4).
You will often want to move something such as GAIN or a filter cutoff over time. Modulation is what you use for that.
You can choose from 11 waveforms.
- Sine
- Triangle
- Saw
- Saw (inverted)
- Square
- LFO S&H
- RAMP UP
- RAMP DOWN
- RANDOM
- ADSR
- Constant
You basically set RATE (a frequency, or in seconds for some waveforms), PHASE, and DELAY (the delay before it takes effect). KEY restarts the waveform from the beginning every time you play a note. SYNC follows the host tempo.
The ENV button sets how the amount of modulation changes over time, with the same hand-drawn envelope as the operators.
How to apply modulation
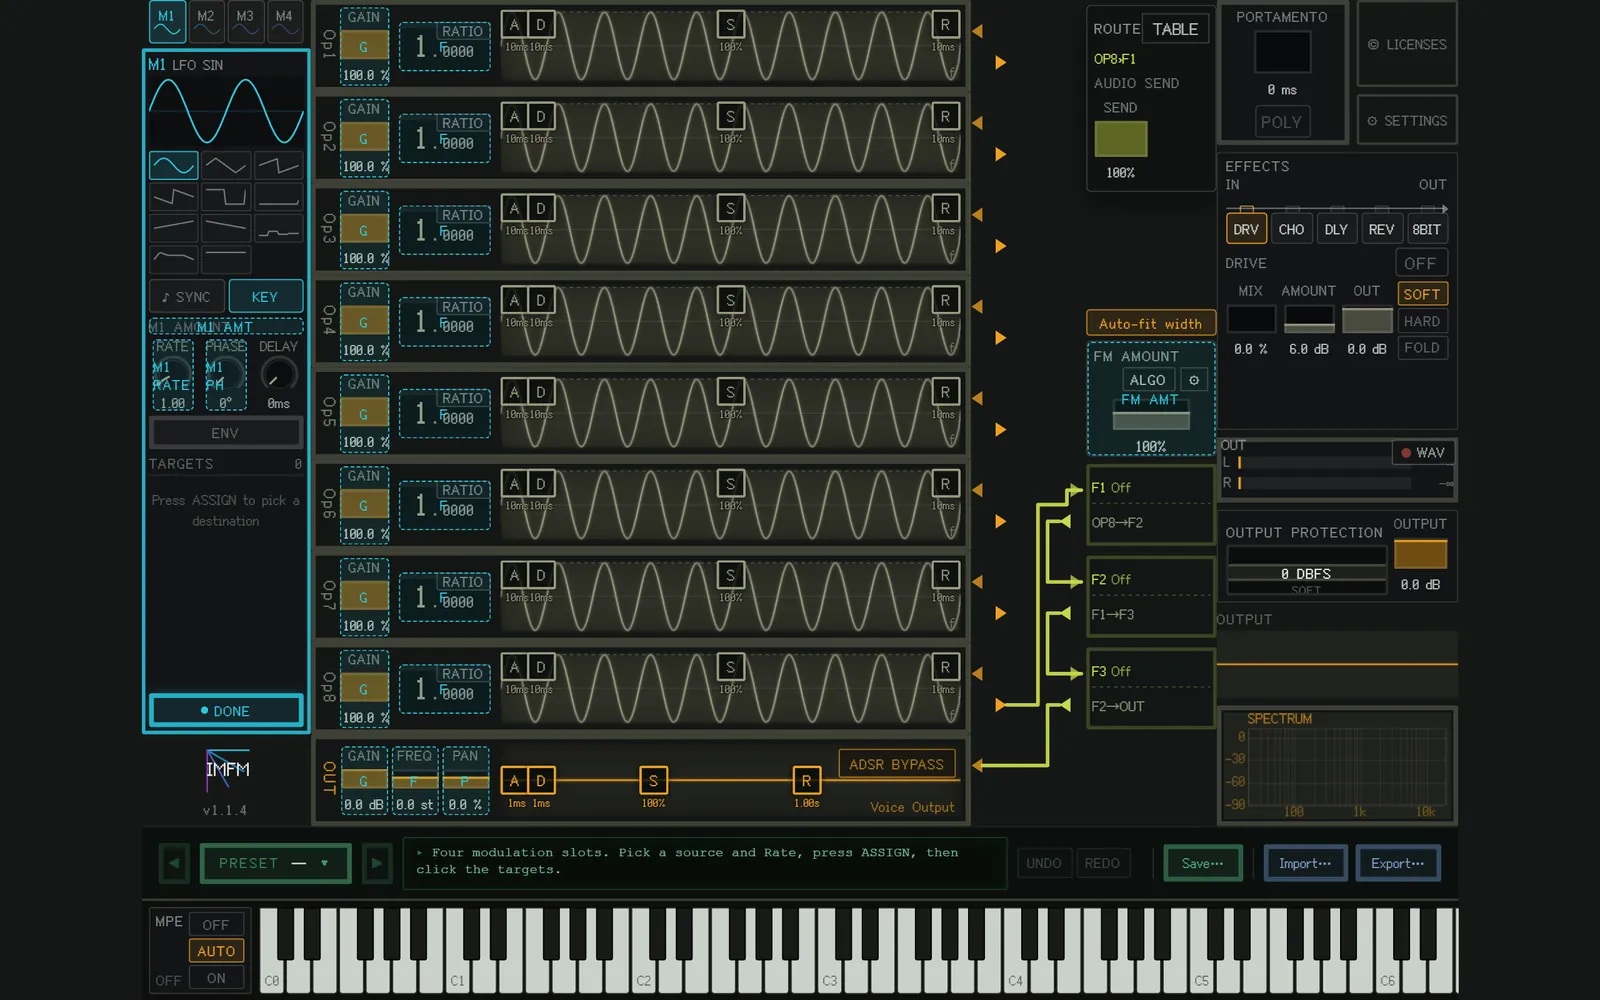
Press the ASSIGN button to enter assignment mode. The places you can assign light up in that modulator's color. Click each target you want to modulate.
When you are done, the button that was ASSIGN has become DONE; press it. The targets you assigned now appear in the TARGETS list, and you set how much to apply with the knob. That is all.
During assignment you can also pick another slot's RATE / PHASE / AMOUNT, which lets one modulator drive another.
A handy use of the constant function
The constant function can produce any shape when combined with ENV. It always outputs 1, so you draw the shape with ENV and set the depth for each destination in TARGETS.
Effects
There are five effects.
- DRV drive
- CHO chorus
- DLY delay
- REV reverb
- 8BIT
Drag and drop the tabs to change the order. Initially everything is OFF. Select an effect's tab and press the ON button to turn it on. Each effect's wet amount is set with MIX.
Only 8BIT needs a detailed explanation.
8BIT
- RATE: sets the sampling frequency, that is, how coarse the time axis is. It is a fraction of the host's sample rate, with a floor of 50 Hz.
- BITS: sets the bit depth of the amplitude quantization, that is, how coarse the vertical axis is.
- MIX: how much of the effect is mixed with the original sound.
MIX, BITS and RATE can all be modulation targets.
Portamento
This glides smoothly from one note to the next. It is set in ms. Above 0 ms the synth becomes MONO (one note at a time) and the pitch glides; at 0 ms it is POLY.
Output and monitoring
- OUTPUT PROTECTION: protects the output. 0 dBFS (the default) cuts the peaks at 0 dBFS. Soft rounds them off gently before cutting. Off removes the protection and leaves the level to the host's fader (only a ceiling near +12 dBFS remains). The meter's CLIP lights only when the protection has actually changed the sound.
- OUTPUT: the very last level, applied after the clip and 8BIT.
- WAV: plays C4 for 2048×256 samples with the current sound and exports it as a WAV. The files go to Documents/IMFMSynth/Exports.
- Spectrum: the output spectrum (20 Hz–20 kHz, logarithmic).
Presets
Click PRESET to open the preset list. In the user presets, Shift+click selects a range, Ctrl (Cmd on a Mac)+click adds or removes one at a time, and dragging sweeps a selection. After selecting, press "Delete selected" and, after a confirmation, they are deleted together. A normal click loads the preset.
Load DX7 banks (.syx) with Import….
Settings
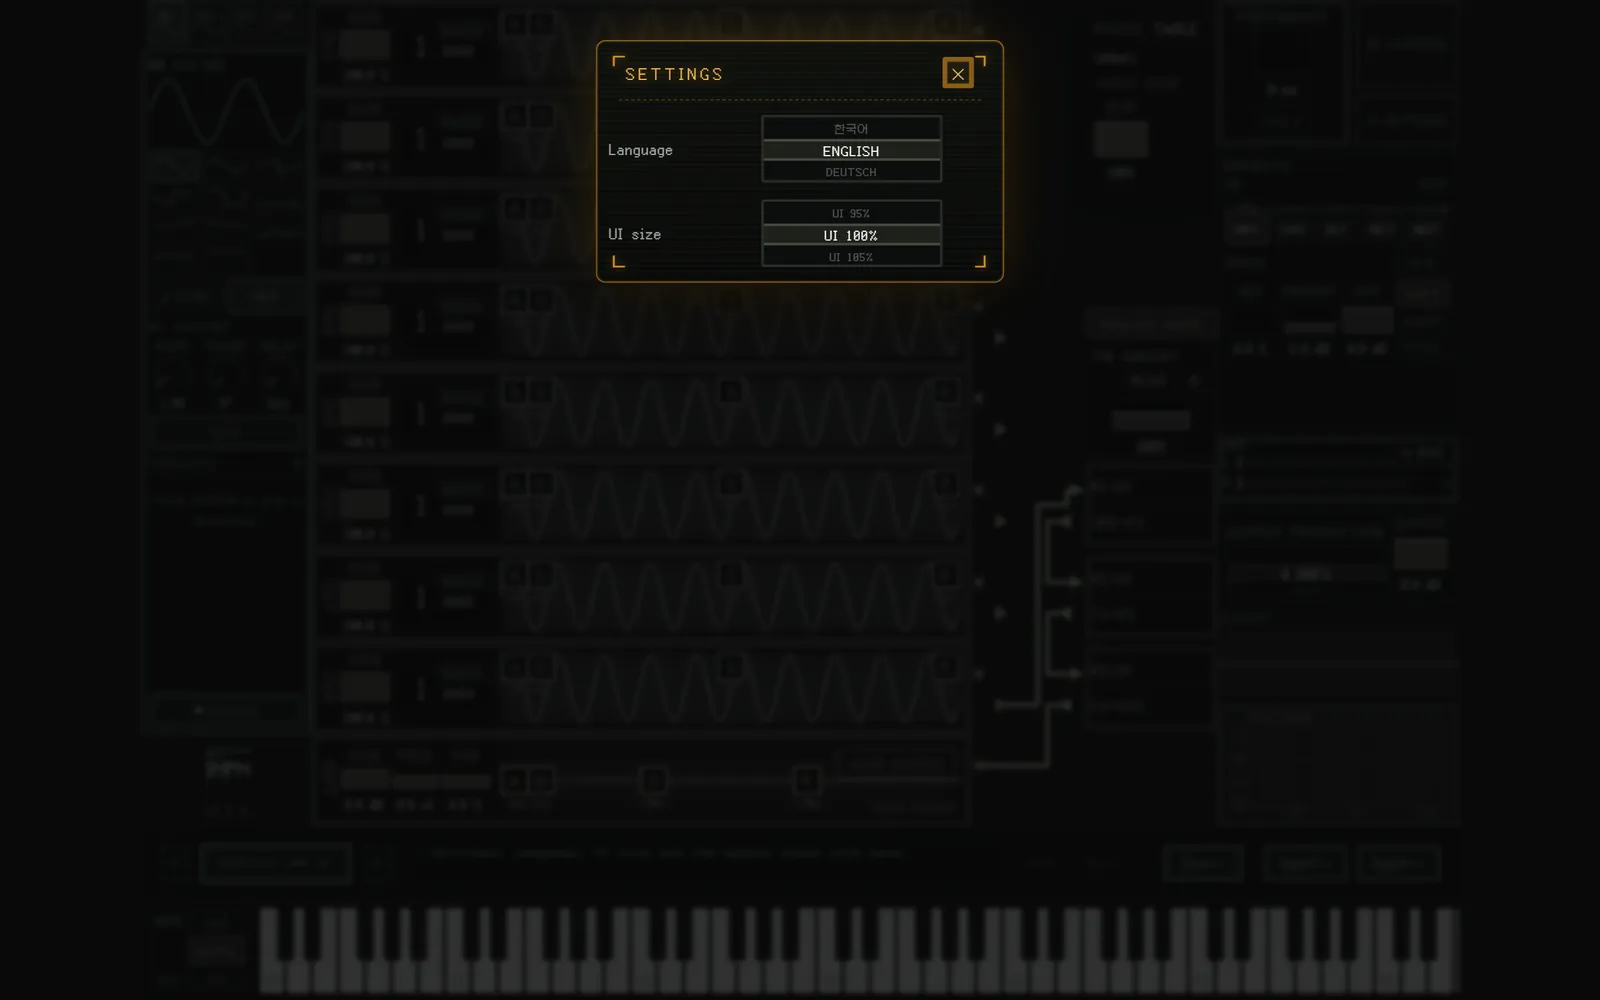
You can set the language and the UI size (75–150%), and there is also an ON / OFF for the automatic update check and a button to check right now. These settings are shared across everything on the PC the plugin is installed on.
With the language set to AUTO, it follows your OS.